Supporto: HD PVR 2 e Colossus 2
- Capture
- Downloads
- Beta
- StreamEez
- WinTV
- 3rd Party
- PS3 setup
- Xbox setup
- PC gameplay
- Manuali
- FAQ
- Troubleshooting
- Video
HD PVR 2 e Colossus 2 Windows driver e Applicazione
HD PVR 2 CD d'installazione
Windows Driver, Hauppauge Capture applicazioni ed utility

Questa versione è per Windows 8, 7, Windows Vista o Windows XP.
Per installare aggiornamenti driver ed applicazione per Windows :
- Cliccare sul link per scaricare il software. Vi verrà proposta l'opzoine di avviare o salvare il file. Cliccare su Salva per salvare il file nella vostra cartella Download.
- Avviate il file. Si installeranno i driver per Windows e l'applicazione Hauppauge Capture ed il supporto del tasto Record button.
- Terminata l'installazione o l'aggiornamento vi verrà richiesto di riavviare il vostro PC
- Durante il riavvio del vostro PC, il "power cycle" del vostro HD PVR 2 installerà il nuovo firmware. Per effettuare il "power cycle" del vostro HD PVR 2, rimuovere l'alimentazione dalla vostra periferica per alcuni secondi e quindi ricollegatelo.
- Quando il PC è riavviato, vedrete l'icona di Hauppauge Capture sul vostro desktop di Windows. Per avviare, cliccare due volte sull'icona Hauppauge Capture.
- Note: Se non vedete l'immagine video sul vostro TV configurate per la prima volta Hauppauge Capture.
- Se tutti i cavi sono collegati correttamente, dovreste vedere i video della vostra console sul vostro PC e sul vostro TV, quindi registrare e streammare il vostro gameplay.
Hauppauge Capture
Windows 11, 10, 8, 7 | Date: 15.11.2024 | Size: 86 MB Release notes | Backup download site | Previous version
Commenti, domande su questa versione beta? Si prega di inviare una e-mail a: sales@hauppauge.com
HD PVR 2 Windows driver version 1.6.34039
![]() HD PVR 2 Windows driver version 1.6.34039
HD PVR 2 Windows driver version 1.6.34039
This version has a fix for an Error code 52 found with some versions of Windows.
Per installare questo l'aggiornamento driver
- Scaricare questo file.
- Scompattare questo file ed avviare HCWDriverinstall.exe
- Quando i drever per windows osno stati installati, vedrete un messaggio Drivers installation status: Successo
- Quando terminato l'aggiornaento, vi verrà chiesto di riavviare il PC. Riavviare il PC
- Durante il riavvio del PC , la routine di alimentazione aggiornerà il nuovo firmware del vostro HD PVR 2. Scollegate
- l'alimentazione del vostro HDPVR2 per qualche secondo , quindi ricollegatelo..
File name: hdpvr2_driver_1_6_34039.exe
Date: Feb. 9, 2016
File size: 5.8MB
Applicazione Personal Logo
L'applicazione di personal logo verrà installato installando il CD di HD PVR 2.
Alcuni consigli su come utilizzare l'applicazione Personal Logo
- Il logo deve essere 150pixels x 100pixels e del formato GIF, BMP o PNG . I file PNG che sono a 24-bit possono essere trasparenti.
- Cliccare su "Browse" quindi trovate il vostro logo. Una volta aperto il logo, posizionate il vostro loco trascinandolo con il mouse.
- Se cambiate la risoluzione di registrazione di HD PVR 2 , l'applicazione ricalcolerà il riposizionamento nel medesimo posto.
- Una volta cliccato il tasto 'OK' in Personal Logo, il vostro logo verrà utilizzato per le cotre registrazioni.
- Potete controllare la trasparenza del loco con l'apposita slide bar. Potete rendere il logo più opaco o piu trasparente.
Qui è disponibile un piccolo esempio su come utilizzare l'applicazione Personal Logo. http://www.youtube.com/watch?v=qBVs5wSlp2I
Beta software for HD PVR 2
None at this time
Hauppauge Capture
La nuova applicazione Hauppauge Capture per HD PVR Rocket
Registra, taglia e carica il tuo game play
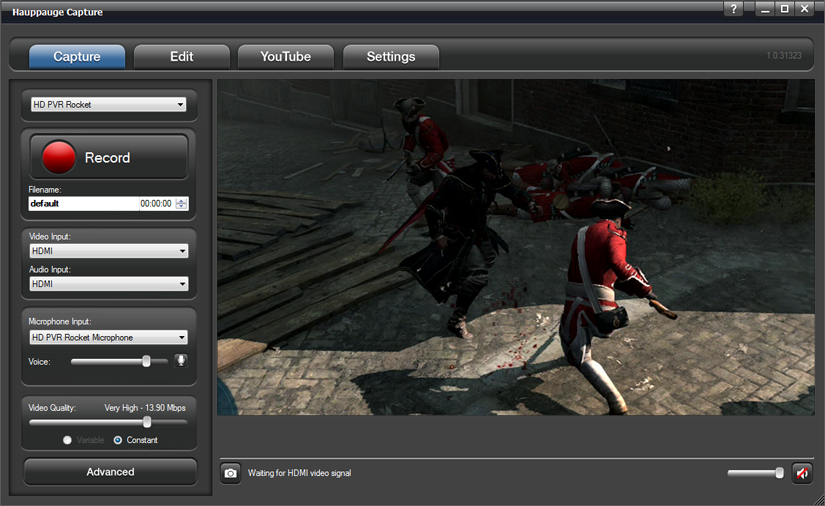
Caratteristiche di Hauppauge Capture :
- Registra il tuoi game play con registrazione del game chat con il sistema di mixer audio integrato ed ingresso microfono
- Editor facile e veloce per tagliare i video
- Sistema di caricamento su YouTube integrato
- Facile da usare con selettore di qualità video video
Scarica gratuitamente Hauppauge Capture:
Hauppauge Capture
Windows 11, 10, 8, 7 | Date: 15.11.2024 | Size: 86 MB Release notes | Backup download site | Previous version
Commenti, domande su questa versione beta? Si prega di inviare una e-mail a: sales@hauppauge.com
StreamEez: Fai la Streaming i diretta del tuo game play, con accelleratore !
StreamEez: stream your video gameplay with Twitch, Ustream and YouTube
File name: streameezsetup_1_4_35054.exe
Date: Feb 24, 2017 | File size: 151 MB
New features in this version
- For Twitch users: add your channel name and pause for a commercial break
- Adds an automatic re-connect mode, to re-establish streaming when your Internet connection is momentarily lost
- Adds streaming support for the HD PVR Rocket

To install this version of StreamEez:
- Click on the download link. You will be given an option to Run or Save the file. Click Save to save the file in your Download folder.
- Run this file. It will install the StreamEez-Pro application plus the Windows driver.
- When finished running the update, you will be ask to restart your PC. Restart your PC
- While the PC is restarting, power cycle your StreamEez device to load the new firmware (remove power from the unit for a few seconds and then plug it back in).
- When your PC has rebooted, double click on the StreamEez-Pro icon.
- Under Source (upper left hand corner), make sure it is set to your Hauppauge device.
- If your cables are connected, you should now be able to stream with Twitch, Ustream or YouTube.
Video on how to use StreamEez
![]() YouTube video
YouTube video
How to setup YouTube streaming with StreamEez
![]() YouTube streaming with StreamEez
YouTube streaming with StreamEez
Some tips on using StreamEez
- Step 1
- Before you change any settings, make sure you are Off Air and the Lock button is unlocked (just click on the button to unlock).
- Choose your Video Source. Xbox 360 normally uses HDMI while PS3 normally uses Component.
- Choose your Audio Source. Xbox 360 normally uses HDMI while PS3 normally uses Line.
- In Quality Profile, the default is High Bandwidth. Depending upon the uplink speed of your Internet service, you may need to change to Medium or Low bandwidth. A laggy or jerky stream means your uplink speed is too low and you need to choose a different Quality Profile.
- If you would like to preview your video in StreamEez, make sure the slider under the preview window is set to 'Normal speed'. You should now see your video in the preview window.
- Step 2
- Then choose your Stream Service, either Twitch, YouTube or Ustream. ( You must have an account setup with the stream service you wish to use)
- In Channel, select Login. Enter your Login and Password. You will see a message "Gathering credentials" as we check your user name and password.
- Once your user name and password are confirmed, you will see the URL of your stream in the box "Copy stream link". If you click on the words "Copy stream link", the URL will be copied to the clip board.
- Step 3
- Leave the Network Connection as the default
- To start streaming
- To start streaming, click the red dot next to "Off Air." The indicator should be changed to "On Air" and you will now be streaming live over the Internet!
- Once you are On Air, you cannot change any settings. You need to stop streaming by clicking the green dot next to On Air to stop the stream.
WinTV per HD PVR 2
Note: WinTV v7 è compreso solo nel HD PVR 2 modello 1512 . tutte le altre versioni di HD PVR 2 possono essere utilizzate con WinTV v7 ma richiedono un acquisto separato del software. Potete acquistare WinTV v7.2 per HD PVR 2 quì.
WinTV v7 setup ed utilizzo per HD PVR 2
![]() WinTV v7 Setup ed installazione, con instruzioni di installazione IR Blaster
WinTV v7 Setup ed installazione, con instruzioni di installazione IR Blaster
Applicazioni di terze parti
HDPVRCapture per Mac
Use HD PVR 2 con Mac.
Capture4ME
Capture4ME è compatibile con HD PVR 2. E un'applicazione facile da utilizzare e focalizzata sulla cattura del video. Capture4ME app ha l'abilita di tagliare dall'inizio alla fine la registrazione, ed anche il servizio di 'Upload per YouTube' per condividere i vostri video online.

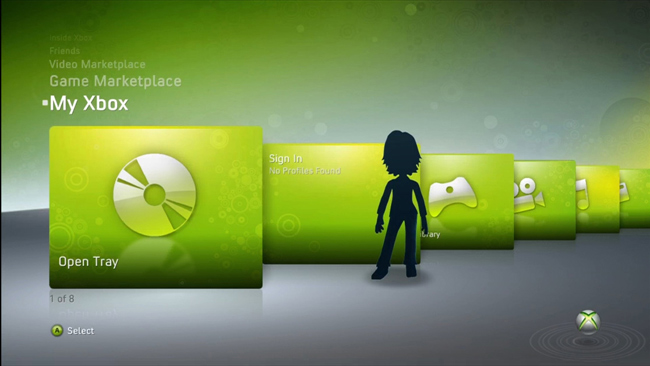
Xbox 360 video setup
Impostazione uscita video per Xbox, istruzioni passo passo
Prima cosa, accendere Xbox e navigate nel menu principale.
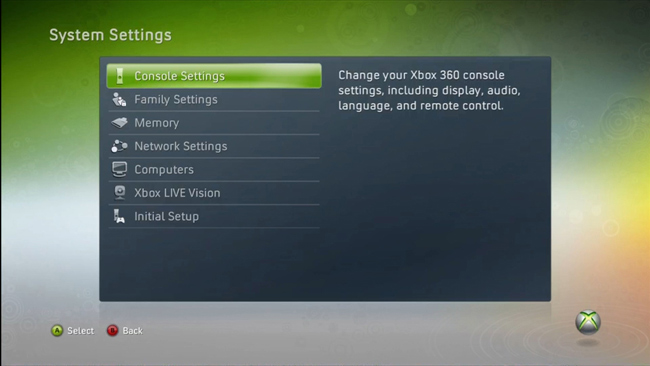
Andate nell'ultimo menu sulla destra Impostazione sistema.

Go into Impostazioni console
andate in Display.
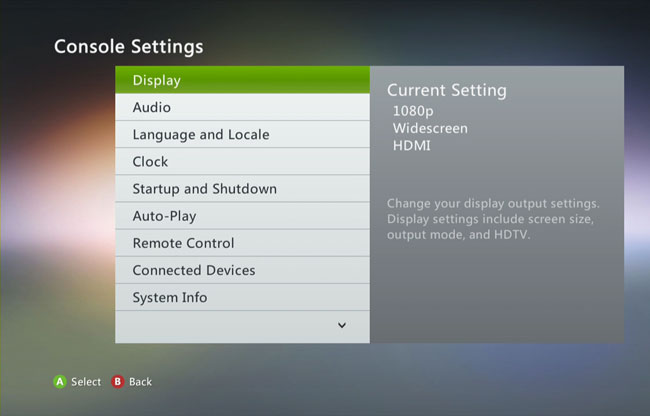
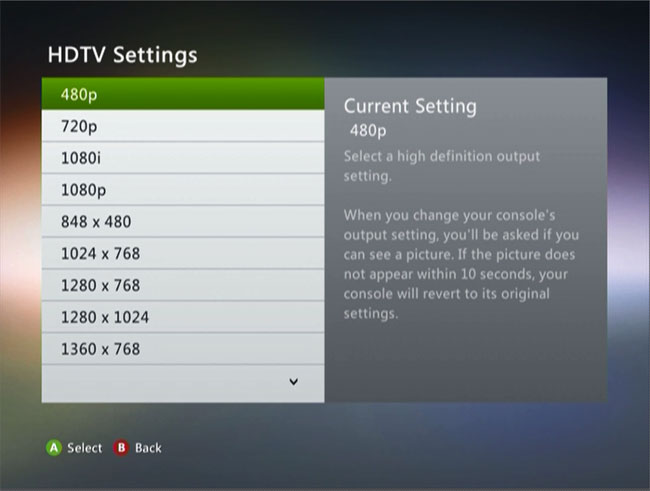
andate in impostazioni HDTV .
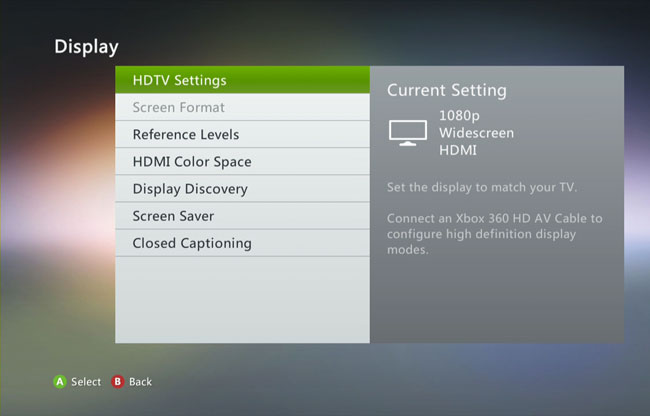
Ora selezionate la risoluzione desiderata.
HD PVR funziona solo con le seguenti risoluzioni 480p, 720p, 1080i e 1080p. se il tuo sistema è impostato ad un impostazione non-standard , come 1360x768, si prega di selezionare 480p, 720p, 1080i o 1080p..
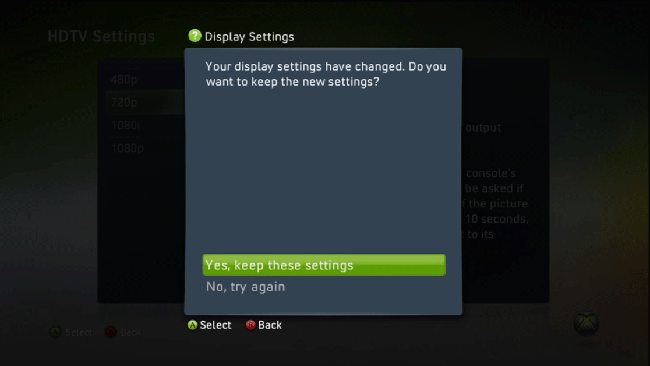
Quando selezionate la nuova risoluzione, vi verrà chiesto se volete mantenere i nuovi settaggi. Selezionate SI, mantieni queste impostazioni.
Ora avete fatto.
Utilizzando HD PVR 2 per registrare il tuo PC game play o lo schermo del tuo PC
Note: HD PVR 2 puo acquisire il video dal PC solo nei seguenti formati: 1920 x 1080 a 60Hz max, 1280 x 720 a 60 Hz max e720 x 480 a 60 Hz max.Se state utilizzando il Pc con qualsiasi altra risoluzione, vedrete lo schermo nero o il video distorto . Controllate la vostra modalità video!
Passo 1 - Installa HD PVR 2 sul tuo PC
Collega HD PVR 2 per il PC (il PC dacui volete registrare) utilizzate il cavo USB allegato.
Installa il software su questo PC dal CD d'installazione Hauppauge.
Quando avete finito l'installazione, è necessario riavviare il PC.
dopo il riavvio, avviare Hauppauge Capture cliccando due vote sull'icona sul desktop Windows.
In Hauppauge Capture, cliccare su Capture tab. Imposta Sorgente per 'Hauppauge Siena Video capture' e Ingresso Video per 'HDMI'. A questo punto vedrete il video nella finestra di anteprima . Questa è normale.
Passo 2 - Confugrate la modalità Video del vostro PC Gaming
Note: HD PVR 2 può accettare il video da PC solo nei seguenti formati:
- 1920 x 1080 a 60Hz max
- 1280 x 720 a 60 Hz max
- 720 x 480 a 60 Hz max
Se aviate qualsiasi altra modalità video, vedrete o la schermata nera o il video distorto. Controllata la vostra modalità video!
Sul computer dove dove state riproducendo il video games (lo chiameremo Gaming PC), collegare il cavo HDMI dall'uscita HDMI della vostra scheda video nel HDMI in del HD PVR 2.
Note: lo schermo del vostro PC dovrebbe diventare nero per alcuni secondi quindi ritornerà sulla schermata di desktop di Windows.
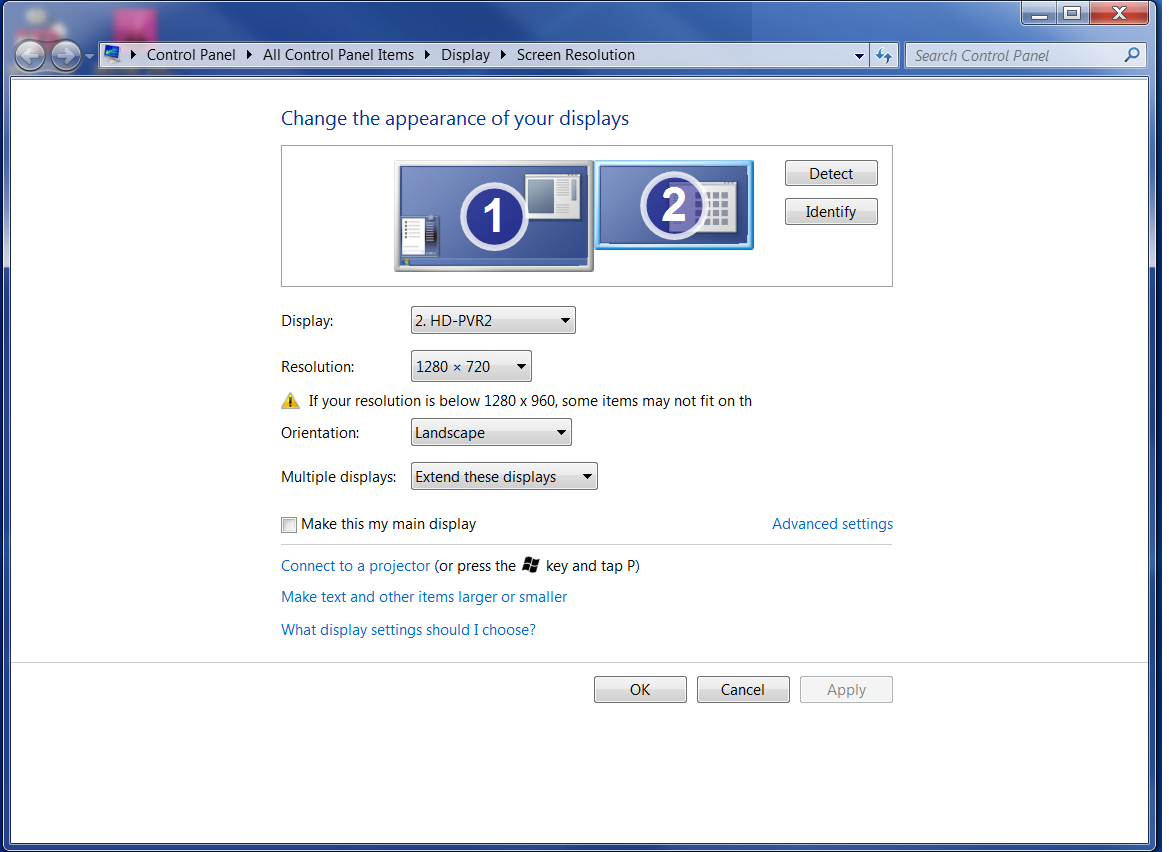
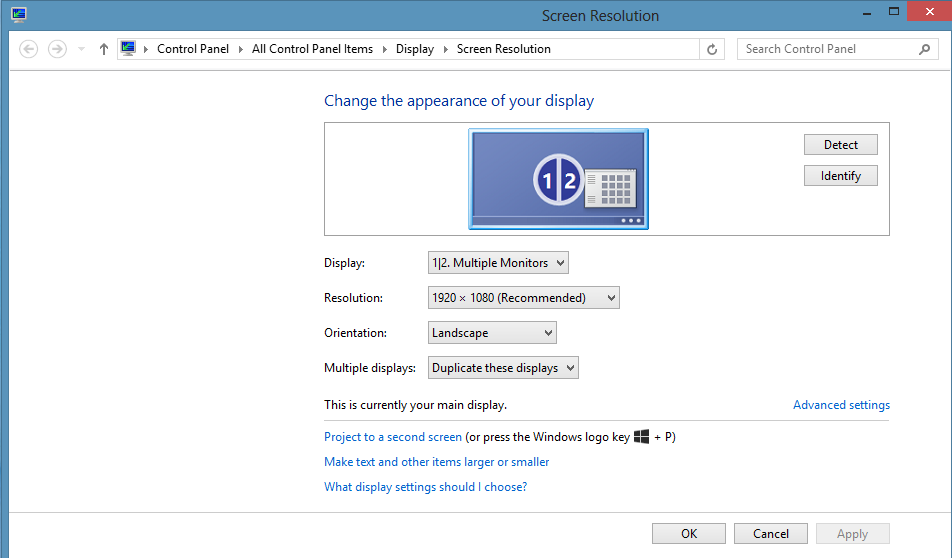
Sul vostro Gaming PC, cliccate a destra sul vostro desktop di Windows e selezionate Risoluzione schermo (cliccate per lo screen).
Sotto Display vedrete HD PVR2 nel menu a scomparsa.
Selezionate HD-PVR 2 (clicate per screen shot).
Sotto Risoluzionesettare altro 1920X1080 o 1280X720.
Sotto Display multiplo, settare su Duplica questo schermo.
Cliccare Impostazioni avanzate (clicca per screen shot). Imposta Refresh Rate a 60p Hz Imposta Scala a Scala display principale.
Passo 3 - Configura l'usciat audio del Gaming PC se state utilizzando il passaggio video HDMI
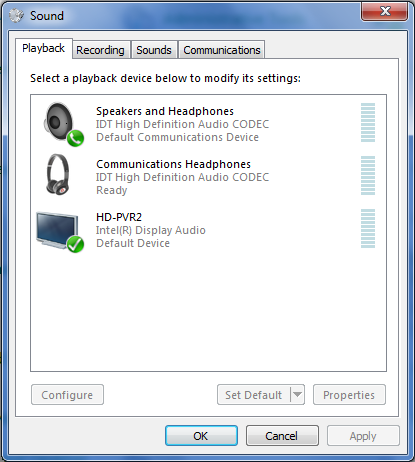
Se utilizzate il passaggio HDMI del HD PVR 2 (se non utilizzate il passaggio HDMI passate il passo 3), sul vostro Gaming PC cliccate a destra sull'icona icona altoparlante nella taskbar e selezionare dispositivi riproduzione.
In dispositivi troverete la vostra connessione HDMI (dovrebbe dire HD-PVR2). cliccate con il tasto dx del mouse e selezionate come default.
Passo 3a - Configurate l'audio se non utilizzate il passaggio video
Se state ascoltando l'audio dal vostro Gaming PC diretto, non state utilizzando il passaggio HDMI del HD PVR 2, per ascoltare l'audio dovete dividere l'audio in arrivo dal vostro Gaming PC. Per fare questo, avete bisogno di 2 adattatori: come 3,5mm di pollice a Y ed un adattatore da 3,5mm stereo a RCA . questi accessori sono comunemente venduti da negozi di materiale audio video o da amazon online.
Collegate l'adattatore a Y da 3.5mm alla porta d'uscita audio verde del vostro Gaming PC.
collegate le vostre casse ad uno delle due uscite 'Y'.
Collegare l'adattatore stereo da 3,5mm a RCA all'altra estremità dell'adattatore Y per collegare HD PVR 2 tramite l'adattatore Hauppauge AV (normalmente si ultilizza il connettore video Component ).
In Showbiz o Hauppauge Capture -> Cattura, selezionare Audio in come Line in e mutate audio in Showbiz o Hauppauge Capture (cosi non ascolterete l'audio con echo).
Note:
Se vedete lo schermo nero nella finestra di anteprima
Sulla risoluzione delllo schermo PC, cliccare Impostazioni avanzate il tasto Ripristina risoluzioni a 60p Hz. Altre risoluzioni potrebbero dare schermo nero.
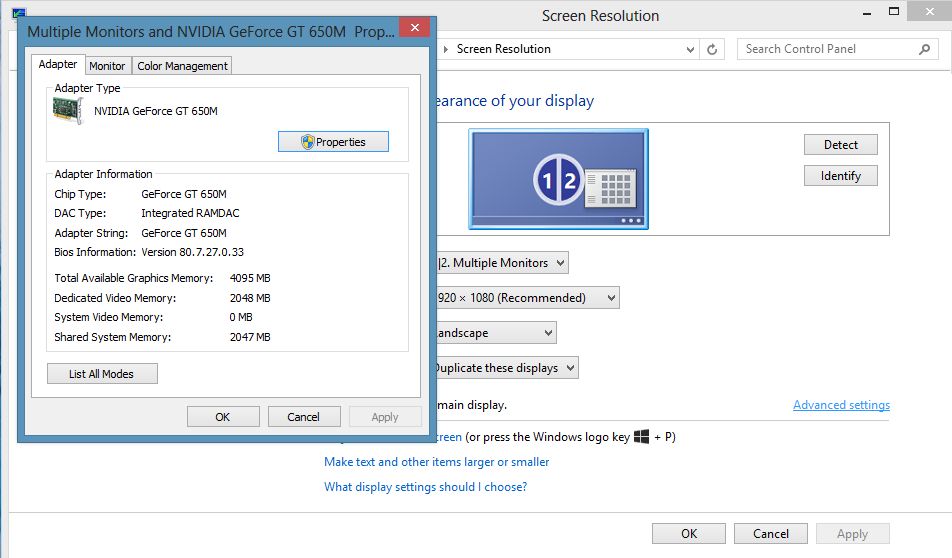
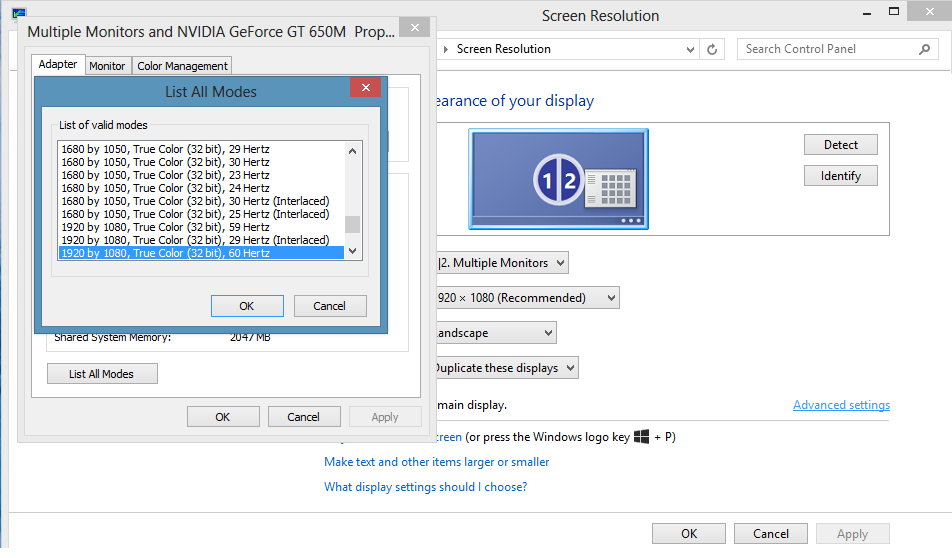
Quì sono presenti altri screen shots se avete una scheda video nVidea 650M nel vostro gaming PC
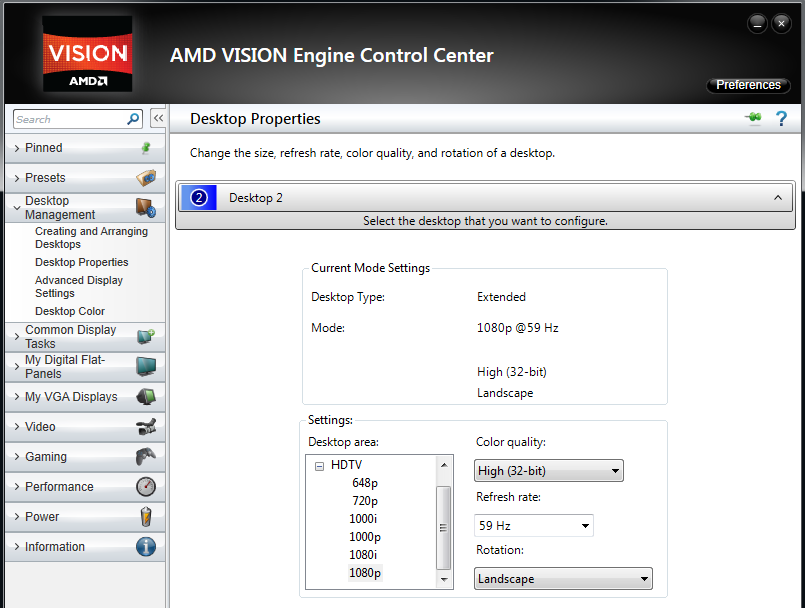
qui sono presenti altri screen shots se disponete di schede video ATI nel vostro gaming PC
In AMD Vision Control Center, sotto Desktop Management/Propietà Desktop , impostateL'area Desktop a 1080p o 720p ed il Refesh rate a 60Hz, 59Hz o 50Hz
Manuali, Guida aiuto ed Utility
HD PVR 2 Guida di installazione Rapida
Here is the latest HD PVR 2 Gaming Edition QuickInstall Guide
Here is the latest HD PVR 2 QuickInstall Guide
Here is the latest Hauppauge Capture Manual
Tutorial per editing delle registrazioni con HD PVR 2 per Sony Vegas
Clicca qui per vedere un tutorial su come fare editing delle registrazioni HD PVR con Sony Vegas Editor
http://www.youtube.com/watch?v=VuL_vc42PZI
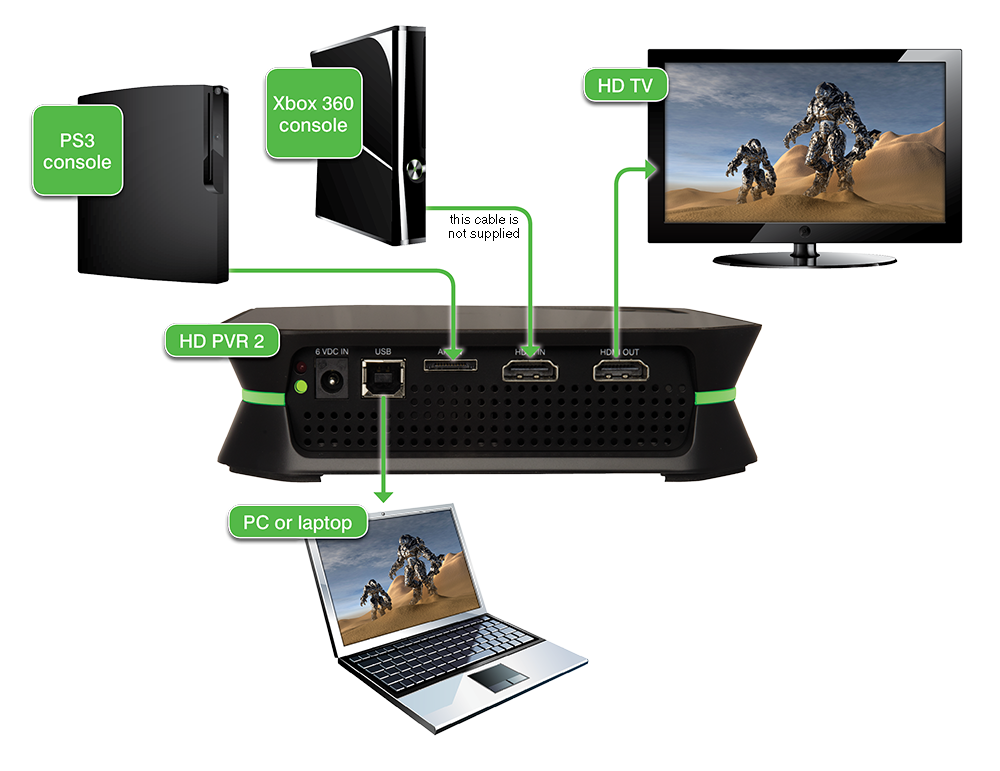
HD PVR 2 diagramma di collegamento
HD PVR 2 Gaming Edition dispone di passaggio video senza ritardo. Simplicemente collegando HD PVR 2 tra la vostra game console ed il vostro Televisore HD. (cliccare l'immagine per allargare)
HCWClear utility per HD PVR 2
![]()
Frequently asked questions per HD PVR 2
che sistema operativo è supportato da HD PVR 2?
Microsoft Windows 8, 7 o Vista (32 o 64-bit), o Windows XP con Service Pack 2 o superiore.
E necessario un PC per usare HD PVR 2?
Si, un PC o laptop è necessario per utilizzare HD PVR 2. Il PC è utilizzato per gestire la'pplicazione di HD PVR 2 e dove il HD PVR 2 archivia le registrazioni. HD PVR 2 non dispone di unità di memoria per archiviare al suo interno.
HD PVR 2 si collega al PC o laptop computer tramite porta USB 2.0/3.0. Le Registrazioni di HD PVR 2 rsono memorizzate nell'hardisk del PC.
Se disponete di un computer Mac, esiste un'applicazioneche può essere utilizzata chiamata HDPVRCapture . Andate in http://www.hdpvrcapture.com per maggiori informazioni.
Io utilizzo HD PVR 2 Gaming Edition. come posso registrare l'audio della mia game chat ?
con la nuova applicazione Hauppauge Capture, potete collegare un microfono 'ingresso mic ' al vostro PC e miscelare l'audiodel vostro game play con l'audio microfono. Ci sono volumi separati per regolare audio del game play e del microfono.
http://www.hauppauge.com/capture
E possibile utilizzare anche un mixer audio esterno per miscelare la vostra audio chat con il game play. Questo è il link per il tutorial su come collegare il microfono al HD PVR 2.
http://www.youtube.com/watch?v=IhP_Pnw-19Y
dovrete avere un mixer audioper miscelare il vostro audio game. qui c'è ne uno che utilizziamo (ma ce ne sono molti altri):
http://www.mcmelectronics.com/product/DISTRIBUTED-BY-MCM-TC-43-/50-6182
Qui è come collegare un microfono quando utilizziamo un XBOX
Quì i collegamenti:
collegare Xbox al HD PVR 2 con cavi HDMI. Questo cavo sarà utilizzato solo per il video.
Per audio, dovete utilizzare 'l'adattatore audio Xbox' per portare l'audio(stereo) dalla Xbox al Mixer. quì con questo adattatore:
http://www.amazon.com/Microsoft-Audio-Adaptor-Xbox-360-Windows/dp/B004S5EH6Q/ref=sr_1_8
Ora colleghiamoil Microfono al Mixer. ci sono normalmente dei jack sul mixer marked 'mic' o 'mic in'.
L'uscita stereo del Mixer andra al connetore audio dell'adattatore Hauppauge AV, quindi collegare l'adattatore Hauppauge AV alla presa AV sul retro del HD PVR 2.
Finalalmente, in Hauppauge Capture, dovrete configurare l'ingresso Video a HDMI MA L'INGRESSO AUDIO è NECESSARIO IMPOSTARE "RCA (STEREO)". questa è una cosa che deve essere fatta. Quindi collegare il vostro TV tramite HDMI come normalmente viene fatto
Posso collegare il cavo del passaggio video di HD PVR 2 ad un TV standard?
L'uscita HDMI del HD PVR 2 puà essere collegata solo ad un televisore che dispone di un ingresso HDMI. HDMI TV normalmente riproduce a risoluzioni video a 720p o 1080p .
Posso utilizzare HD PVR 2 con un Mac?
Se acquistato un HD PVR 2 Gaming Edition Plus, avrete a disposizione una copia gratuita del software HDPVRCapture per Mac.
Se avete un HD PVR 2 o un HD PVR 2 Gaming Edition, potete acquistare HDPVRCapture separatamente. Per maggiori informazioni, si prega di consultare:
www.hdpvrcapture.com.
Requisiti di sistema
Windows 8, 7, Vista e Windows XP com service pack 3. supporto per Mac tramite HDPVRCapture.com
Potete registrare i video di HD PVR 2 su qualsiasi PC. vecchi, lenti, laptop o desktop PC possono essere utilizzati per registrare video con HD PVR 2. anteprima Video su vecchi PC e laptopspotrebbe apparire danneggiata o con lag, ma la registrazione sarà ottimale.
But when you playback an HD PVR 2 recording on your PC screen, you need a fast CPU and at least 256MB of graphics memory. Here is what we recommend for video playback (minimum):
- Dual core CPU 2.0Ghz or faster
- Graphics with 256MB memory (or greater)
- Sound card
- USB 2.0 Port
Can I record composite video from my old PS2 or Wii?
Yes. Connect the yellow cable from your Wii to the Blue connector on the Hauppauge AV cable. Then connect the red and white audio cables from your Wii to the red and white connectors on the Hauppauge AV cable. Then, in Showbiz or Hauppauge Capture, select Composite under Video input and Line In under Audio input.
Can I use the HD PVR 2 with Linux?
Currently, there are no drivers available for Linux.
Can I use HD PVR 2 with the Hauppauge WinTV v7 application?
Yes. If you use WinTV v7.2 with the HD PVR 2, you can record videos plus use Extend for live streaming.
Can I record high definition TV from a Cable TV or Satellite box?
Yes. By connecting the Component video output from your high definition cable TV or satellite TV set top box to the Component video inputs of the HD PVR 2, you will be able to record the TV programs coming from your set top box to the hard disk. Component video connections are normally the Red/Green/Blue connectors on the back of a set top box. Sometimes they are also called YPrPb or YCrCb connectors.
The HD PVR 2 model 1512 comes with the cables to connect to your satellite or cable TV set top box.
What type of recordings can I make with the HD PVR 2?
HD PVR 2 encodes in real time directly to the hard disk in an H.264 format. There are three formats which you can choose when recording a video:
- .MP4 which is compatible with many video editors plus playback on the XBox360. MP4 is the preferred format for Sony Vegas. Apple iMovie version 9.0.4 can edit HD PVR 2 MP4 files.
- .TS which is a generic 'transport stream' compatible with many digital media players
All record file types can be used to burn AVCHD Blu-ray compatible discs but you will need to supply your own disc burning application.
What type of audio encoding is made with the HD PVR 2?
There are two ways of bringing audio into HD PVR 2: through the Line In (RCA) stereo audio jacks on the A/V connector or through the HDMI connector. When bringing audio in through the stereo jacks, audio is recorded as AAC. When bringing audio in through the HDMI connector, the audio is also recorded in the AAC format.
DTS audio is currently not supported.
MP4 format recordings are recorded using AAC.
If you have the HD PVR 2 model 1512 or the HD PVR 2 Gaming Edition Plus and are bringing in 5.1 channel audio from either HDMI or optical audio, your recordings will be made with 5.1 channel AC3 audio.
Can I output files I've recorded with my HD PVR 2 or other content from my PC back to an external TV monitor through the HDMI outputs on the HD PVR 2?
No, the HD PVR 2 itself does not have the ability to play back recorded videos to an external monitor. To playback recorded videos, you will need to connect your laptop or PC to your TV set.
The HDMI video output on HD PVR 2 acts as a pass through for live video streaming from your video source through the HD PVR 2 back to your TV monitor. The power of the HD PVR must remain in the on position in order to pass the video through to the external TV.
If I record my game play, can I uploaded it to YouTube?
Yes. Recordings made with HD PVR 2 are in a format which can be immediately uploaded to YouTube without conversion. ShowBiz records from HD PVR 2 in an H.264 form. ShowBiz Edit allows you to trim your videos very quickly without the need to re-encode. ShowBiz "Upload to YouTube" saves your login settings and allows you to upload your videos.
When I upload videos to YouTube using Showbiz, I do not get an HD option for playback
In Showbiz, you have to set the default resolution to at least 720P when uploading to YouTube in HD. This is done by going to Options; Preferences; Other and selecting the desired YouTube resolution.
Can my PC go into hibernate or sleep mode when using HD PVR 2?
The current driver for HD PVR 2 does not allow your PC to go into Hibernate or Standby mode when it is either recording or previewing video.
My PS3 is not selecting Component video out, and I see a black screen in Showbiz. How can I fix this?
This happens if you connected your PS3 using HDMI and now want to use Component video so you can record with HD PVR 2.
To fix, you need to reset the video settings on your PS3. To do this:
- Make sure you have the HDMI cable disconnected on your PS3
- Then push the PS3 power button on the front of the PS3. You should see the light go Red. This means your PS3 is turned off.
- Then hold down the PS3's power button until you hear two beeps (one beep, then about 5 seconds and a second beep).
Your PS3 should now be set to Component video out and you should see video in the preview window in Showbiz Capture.
When opening the Showbiz Capture, I see a Channel button. Why?
If you have a TV tuner card installed, Showbiz Capture may attach to this or any other capture device installed. If you see a Channel button on the Capture Module window go to the Source drop down menu at the top and select the Hauppauge HD PVR 2 Capture Device.
Video in ShowBiz preview window has incorrect colors?
Most of the time this is caused by either one of the Component video connectors is not connected. For example, if the Red connector is not connected correctly, your video picture will look green.
Also try updating to the latest drivers supplied by your graphics card manufacturer.
I see a change in brightness every few seconds in Hauppauge Capture and Showbiz while recording, streaming or playing back my video recordings. But my recordings are fine. What is going on?
If you are running an AMD graphics card in the PC which the HD PVR 2 is connected to, you may experience a slight change in brightness every few seconds while in the preview or edit screens. This is due to an issue with hardware acceleration that we have seen in some AMD drivers. This shift does not affect recordings and typically can be eliminated by either changing drivers for the graphics card or by disabling Hardware acceleration.
Video is jerky or broken up while capturing, yet my recordings are perfect. Why?
This is caused by either a slow processor in your laptop or desktop PC, or the display adapter is having a problem. Make sure your video card meets the minimum requirements. Also try updating to the latest drivers supplied by the manufacturer.
In September 2012, there was a problem with the ATI graphics driver which would cause jerky video or freezing of the video screen. This should be fixed with an update from ATI on their graphics drivers.
I get a black screen in the ShowBiz Capture window when using Component video from a cable TV set top box.
Some set top boxes will disable or turn off the component output if the HDMI or DVI output is being used. Check to see how you have your Television connected to your set top box. You might need to disconnect the HDMI connector on your set top box when you want to record TV programs.
Audio pass through does not work
In order for the audio pass through to operate, you need to configure the settings in the Showbiz application. In Showbiz, click on Capture. Make sure Source is Hauppauge Siena Video Capture. Then click the Audio input pulldown from the drop down menu ( RCA, HDMI ). Once configured, the HD PVR 2 will retain these settings. Note: the HD PVR 2 must be powered on for the pass through to operate.
My video recordings look pixelated with fast motion. What can I do?
Increasing the recording bitrate will eliminate motion artifacts in your recordings. Here is how to do this:
In Showbiz Capture module, click the Format setting button. Then click the Video Encode tab. Under Bitrate, set to 10000000 (this is 10 Mbits/sec bitrate). Under Bitrate peak, set to 20,000,000 (this is 20 million bits/second). Under Bitrate mode, set to Variable.
You can experiment with other settings, but in our experience, these are good for uploading to YouTube.
What resolutions and bit rates are supported using the HD PVR 2?
- Video record resolutions are 1080p30, 720p60, 540p60, 480p60 and a number of downscale variants of these formats.
- You can record at datarates from 1Mbs to 13.5Mbs, constant and Variable Bit Rate
What file formats are created by recording with the HD PVR 2?
The default formats you can record in are: .TS (transport stream for AVCHD), .M2TS (for PS3), and .MP4 (for most video editors and for playback on an Xbox 360).
How much disk space will it take up when recording?
Approximately 2 GB per hour at 5Mb/s setting.
Approximately 4 GB per hour at 9Mb/s setting.
Approximately 6 GB per hour at 13.5 Mb/s setting.
Can I use HD PVR 2 independently from a PC?
No, the HD PVR 2 requires a PC to operate. But once you have connected your PC to HD PVR 2 and have gotten Showbiz running, you can disconnect the USB cable to your PC and the passthrough will continue to run as long as HD PVR 2 still has power.
Can I use a longer USB cable with my HD PVR 2?
It is not recommended to use a different USB cable other than the cable provided with the device.
Can I burn a Blu-ray disc with my HD PVR 2?
You can burn Blu-ray compatible discs but a disc burner is not supplied with HD PVR 2.
What are the specifications for the power adapter that is included with the HD PVR 2?
The power adapter is 6V 1.6 amps.
Troubleshooting
Uploading videos to YouTube
To change the upload resolution for YouTube, in ShowBiz click the Option button (upper right hand corner) and select Preferences in the dropdown menu. In the Preferences window click on the tab that reads Others. At the bottom of this tab will be the upload resolution to default to when uploading clips. For HD uploads to YouTube, we recommend 720p as a minimum. By default, Showbiz is set to 240p. View the Preferences page
What do the lights on front of HD PVR 2 mean?
- Blue light: When HD PVR 2 is powered on and ready to start recording, the blue light is on. When the blue light is blinking, the HD PVR 2 is not 'seen' by your PC. Check the USB cable!
- Yellow light blinks once when Capture runs: the HD PVR 2 is ready to start recording.
- Yellow light on: this means video is present and HD PVR 2 detects video on the currently selected video source. For example, if you are using ShowBiz and have selected HDMI and have a active HDMI source, then you will see a yellow light on the front of HD PVR 2.
- Green LED ring: indicates that HD PVR 2 is recording video to your disc drive.
- Red light: this means the video encoder inside HD PVR 2 cannot send data to your PC. There are a number of reasons this could happen. If your PC is running slowly and cannot get data from HD PVR 2 quickly enough, the red light might go on for a few seconds until the PC can accept data. If there is a problem with your USB cable or the USB port on your PC, the red light might be illuminated. Change to another USB port on your PC, then power down HD PVR 2, wait a few seconds and power up again. If you continue to see the Red light while recording, check your cabling and if you continue to have problems, contact Hauppauge technical support.
"Device is not available" message in Showbiz Capture:
This is normally caused if you forgot to set "Hauppauge Siena" in the Source in the Capture module (see page 7 of the Hauppauge HD PVR 2 QuickInstallation Guide). Check the following in Showbiz => Capture:
In Source: make sure Hauppauge Siena Video Capture is selected. You might need to click Refresh for Hauppauge Siena to appear.
In the Video Input: select HDMI if you are using an Xbox 360 or Component (YPrPb) if you are using a PS3.
In the Audio Input: select HDMI when using an Xbox and Line in (RCA) if you are using a PS3
If you do not see Hauppauge Siena listed under Source
Reinstall the Hauppauge Windows driver from either the Installation CD or as a download from the Support page. At the conclusion of the installation, you will see a message "Your drivers have been successfully update". You can then run Showbiz => Capture and set Source to Hauppauge Siena.
Black screen in the ShowBiz Capture preview window and no video on your TV set:
- First, make sure, in Showbiz => Capture, Source is set to Hauppauge Siena.
- If you are using an Xbox, make sure your video is set to 720p or 1080p. Some Xbox video formats will give a black screen in Capture and your TV set.
- If you still do not see video on your TV set or on your PC screen, if you are using a PS3 you might need to reset the video mode on your PS3. To do this on the PS3 Slim, push the power button on the front until the light goes red. Then push and HOLD the button until you hear two beeps. Then you can release the power button and the PS3 video format will be set to the default.
- If you are using an Xbox, change your HDMI cable in case you have a broken wire inside the cable.
Black screen in the ShowBiz Capture preview window:
First, make sure, in Showbiz => Capture:
Source: make sure Hauppauge Siena Video Capture is selected.
Video Input: select HDMI if you are using an Xbox 360 or Component (YPrPb) if you are using a PS3.
Audio Input: select HDMI when using an Xbox and Line in (RCA) if you are using a PS3
If you still do not see your game video in the preview window in Showbiz => Capture:
- Most problems here are basic cabling and settings in game consoles. Check you cables!
- If you choose the wrong video source in Arcosft Showbiz, you will get a black screen. For example, if you connect Component video but Arcsoft Capture is set for S-Video, you will get a black screen.
- Uncheck "hardware acceleration" in Capture. On some PCs, hardware acceleration will not work and you will see video on your TV set but not on your PC screen.
- If you are using a PS3, check to make sure the Red, Green and Blue cables are connected from the game console to the same color RCA connectors on the Hauppauge AV cable on HD PVR 2.
- As a test to make sure the cables are correct and are working, connect the game console directly to the HD TV set with the same video game component cables. If you see your game on the HD TV set, then the cables are o.k.
Then:
- Step 1: Check your USB cable and make sure the blue light is on on the front of HD PVR 2.
- Step 2: Check your video cables.
Try removing each cable and make sure it is firmly reseated into each device you are using.
Is the yellow light on on the front of HD PVR 2? If the yellow light is not on, then either you have the wrong Video input source set or your game console is not turned on.
On the PS3, disconnect the HDMI cable between the PS3 and your TV set. Having HDMI connected at the same time as Component video will shut off Component Video and you will not see video in ShowBiz.
On the PS3, if you left the HDMI cable connected by mistake, then once it is removed you need to reset the Video format. To do this on the PS3 Slim, push the power button on the front until the light goes red. Then push and HOLD the button until you hear two beeps. Then you can release the power button and the PS3 video format will be set to the default (480p plus AV out). - Step 3: Once you have confirmed your video source is on, the Video input is correctly set and the yellow light is on the front of HD PVR 2, if you still see a black video screen in Arcsoft ShowBiz try capturing some video in the Capture module. If you can successfully playback a recording but you cannot see live video in the Preview window, there might be a video rendering problem (video card drivers, hardware acceleration…) Check device settings for video decoder details. To enable hardware acceleration, select "hardware acceleration" in ArcSoft ShowBiz Capture.
If capture fails, it is likely something is wrong with the video input to HD PVR 2. This could be a broken or loose video cable or you plugged the cables into the wrong connector on HD PVR 2.
Tips on installing HD PVR 2 with the PS3
- Make sure you remove any HDMI cable connected to the PS3. If you do not disconnect the HDMI cable from your PS3, Component video will NOT be enabled and you will have a black screen in Capture.
- As the instructions say, plug the PS3 Component video cable that came with the HD PVR 2 into the AV connector on the back of your PS3. Then connect the colored RCA connectors (Red, Green, Blue video plus White and Red audio) of the PS3 Component video cable into the Hauppauge Component AV Cable adapter. The Hauppauge Component AV Cable adapter plugs into the back of the HD PVR 2 where it says AV in.
- Next, in the spot on the back of HD PVR 2 which says 'HDMI out', plug one of the HDMI cables. Plug the other end of the same cable into your TV set. (The HDMI In connector on the back of HD PVR 2 is not used with the PS3, so just ignore that port)
- To complete the installation, open Arcsoft Showbiz on your PC and click on Capture. This should open the Capture window. Make sure that the Hauppauge Siena Video Capture is selected in the Source dropdown menu. Now, from the Video Input drop down menu, select 'Component (YPbPr)'. If all goes well, you should see your PS3 video in the Capture preview window.
- If, however, you do not see video in the Capture window, you may have to go into your PS3's Display settings and change to Component video.
Pass through video problems (if you do not see your game console video on your TV set, but you can see video in Capture)
Once HD PVR 2 is turned on and you run Capture and set the Source, HD PVR 2 will run even if you remove your PC. In order for you to see your game video on your TV set:
- the HD PVR 2 needs to be powered on
- you must run the Showbiz Capture once and choose your Video input source (HDMI for the Xbox and Component video for the PS3)
- After you set the Video input source, you can remove your PC and the input you selected will stay until you change it or you turn the power off on the HD PVR 2
No video passthrough or I see flashing or distorted video on my TV monitor:
- If you have a PS3, you might need to reset the video on your PS3. To do this, push the Power button on the front of your PS3. It will turn red. Then, PUSH AND HOLD the power button until you hear the SECOND beep. The second beep means the video mode has been reset. You should now see video on your PC screen and on your TV set.
- Open ShowBiz and verify the correct Video input is selected. Video and audio input must be set initially for passthrough to work (if you power cycle the HD PVR 2, it may revert to its default setting and will need to be set again).
No video on my TV monitor but I can see video in ShowBiz Capture
- Check that the HDMI cable from the HD PVR 2 (HDMI out) is connected to your TV monitor and the TV is set to the correct HDMI port if multiple are available on yourTV.
- Try changing the output resolution from your game console. Some TV monitors may not support all HDMI output resolutions.
I can not see my game video on either my PC screen or on my TV set
- If using HDMI, verify your source device does not use HDCP copy protection (the PS3 uses HDCP on HDMI). If this is the case use the Component video input.
- If you are using a PS3, make sure your HDMI cable is not plugged in.
- You might need to reset your game console video in order for passthrough to work. To reset the video, do the following:
- PS3: Turn the PS3 off via the power button on the front of the unit. Flip the power switch on the back of the PS3 to the off position. Push and hold the power button on the front of the PS3 while you flip the power switch on the back of the PS3 to the on position. Once you hear the second beep, release the power button on the front of the PS3. Your PS3 video will be reset.
- Xbox: Remove any games from the optical drive. Turn the Xbox 360 off. Turn the Xbox back on via the controller. As the console starts, press and hold the Y button, and then pull the right trigger at the same time. Your Xbox video will be reset.
Inputs and outputs and how they are configured
The HD PVR 2 was designed to pass through any input to the HDMI output of the device. So whichever input you choose (composite, S-Video or Component) will be routed to the HDMI out.
NOTE: if you are using composite or S-Video input, the HDMI video output will be standard definition even though you are using component cables.
Troubleshooting the HD PVR 2
Note: There appear to be a number of HD PVR 2 users who are extending their USB cables because their computer is located a distance from HD PVR 2. This can potentially cause problems such as "no device detected" or a black screen in Showbiz Capture or bad video recordings. If you are using a long USB cable and are having problems, do an experiment and see if you problem goes away by connecting HD PVR 2 to your PC with the USB cable supplied with HD PVR .
Black screen in Showbiz Capture
- Next, check input make sure the video source setting is correct for your cabling. Do you see a valid resolution and bit rate for source? Try changing the resolution of the source ..
- If you have a Resolution and Bit rate shown, check “enable preview” setting.
- Try to capture. If capture is successful the problem could be a video rendering problem ( video card drivers, hardware acceleration…) If capture fails, there is something wrong with the video or audio input.
Black screen in Showbiz Capture with Video Game Systems
- Most problems here are basic cabling and settings in game consoles.
- Also, if you choose the wrong video source in Arcosft Showbiz, you will get a black screen. For example, if you connect Component video but Arcsoft Capture is set for S-Video, you will get a black screen.
- PS3 or Xbox 360: do you have the correct A/V cables? The PS3 and Xbox 360 do not include the A/V Component cables. These need to be purchased separately.
- Check and make sure the Red, Green and Blue cables are connected from the game console to the A/V Input on HD PVR 2.
- As a test to make sure the cables are correct and are working, connect the game console directly to the HD TV set with the same video game component cables. If you see your game on the HD TV set, then the cables are o.k.
Pass through problems
Pass through problems, such as a black screen on your TV set (even though you can record videos), are usually basic cabling and settings in Showbiz. Check your cables!
The best way to proceed is:
- disconnect the game console from whatever it is connected to …. all cables (component, audio, HDMI)
- then start by only connecting the game console to the HDPVR using any cable set
- Run TMe and make sure you can see video on your PC screen
- Once you know HD PVR 2 can preview video and capture, connect the pass through to your HD TV set
If all input and pass through connections are correct and pass through is still not working, check your HD TV for correct input source. If input is correct, try changing input resolution of source to HDPVR 2.
Video/ Audio Stutter
If you have stutter in your preview window, check that system specs meet the minimum required. This is not a fatal problem since the HD PVR 2 will make good recordings even if the preview window slows down.
Preview good but stutters in playback on your PC screen: this normally means your PC or graphics card is too slow. Check the video card specs.
Random lockups
- Try a different source
- Try a different USB port
- Don't use extra long USB cables
- If you are using a hub, remove it.
- Remove other USB devices if they could hog bandwidth (such as a USB camera)
HD PVR 2 Videos
Click here to see all our videos on the Hauppauge YouTube channel ![]()
HD PVR 2 | 360° view
HD PVR 2 featuring PlayStation3
HD PVR 2 featuring Xbox 360
StreamEez
How to: Record game commentary with a Turtle Beach PX21 headset using Hauppauge Capture and an Xbox 360
How to: Record game commentary with an Turtle Beach headset using Hauppauge Capture and a PS3
How to: Record game commentary with an Astro A50 headset using Hauppauge Capture and a PS3